Showing posts with label DIY. Show all posts

Monday, March 7, 2016

Pics from DIY Cameras!

On Saturday we had our kick-off program to Teen Tech Week - we built our own cameras!


Not too many pictures because as you can see, we were working really hard!  In fact, we kind of went over our 2 hour program!  We had fun though and everyone left with their camera completed and a roll of film to put in it.  Can't wait to see if they come back and show me some pictures they took!

Friday, August 30, 2013

New School Year...New Books for September! (part 3)

45 Pounds (more or less) by K. A. Barson
When Ann decides that she is going to lose 45 pounds in time for her aunt's wedding, she discovers that what she looks like is not all that matters.

 Somebody, Please Tell Me Who I Am by Harry Mazer
Wounded in Iraq while his Army unit is on convoy and treated for many months for traumatic brain injury, the first person Ben remembers from his earlier life is his autistic brother.

 Delilah Dirk and the Turkish Lieutenant by Tony Cliff
Join troublemaker Delilah Dirk for a headlong plunge into adventure!Lovable ne'er-do-well Delilah Dirk is an Indiana Jones for the 19th century. She has traveled to Japan, Indonesia, France, and even the New World. Using the skills she's picked up on the way, Delilah's adventures continue as she plots to rob a rich and corrupt Sultan in Constantinople. With the aid of her flying boat and her newfound friend, Selim, she evades the Sultan's guards, leaves angry pirates in the dust, and fights her way through the countryside. 

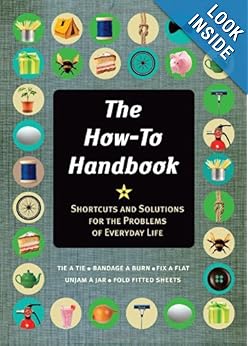
The How-To Handbook by Martin Oliver
Whether you plan on spending your life playing sports, serving clients, running businesses, or flying to the moon, there are certain things that everyone just has to know how to do: unjamming a jar, for instance, fixing a flat tire, and removing a particularly embarrassing stain. They may seem simple in retrospect, but you don’t have to turn all your laundry pink more than once before you learn that it’s best just to get things right the first time. The How-To Handbook packs over 50 essential life skills into one handy reference book.

Out of the Easy by Ruta Sepetys
Josie, the seventeen-year-old daughter of a French Quarter prostitute, is striving to escape 1950 New Orleans and enroll at prestigious Smith College when she becomes entangled in a murder investigation.

Tuesday, September 18, 2012

Who still plays with Play-doh?

It's Play-Doh Day!  Play-Doh has been around since the 1930s when it was originally intended to clean wallpaper!  Kids in school started to use it like clay to model things and ta-dah!  Play-doh as you know it was born.

Play-doh is a lot of fun...but it can get expensive when you want a lot of different colors.  So...make your own!  My mom used to make this for my brothers and me all the time when we were kids.  Here's the recipe.  Remember to be careful when using the stove!

Homemade Play-Doh

Supplies
* 2 cups flour
* 2 cups warm water
* 1 cup salt
* 2 tablespoons vegetable oil
* 1 tablespoon cream of tartar (find it in the spice & herb section of the grocery store)
* your choice of food coloring!
* scented oil (optional if you want it scented.  smells fine on its own too)

Directions

1. Get out a medium sauce pot.  Measure and pour in the supplies.  (if you want to make the play-doh into multiple colors, do not add food coloring now.  If you want it all one color, add it now.)
2. Mix well over low heat.
3. When your play-doh pulls away from the sides and clumps up together in the center, take the pot off the heat and set aside to cool.  It should NOT be sticky!  If your play-doh is sticky, cook longer.
4. When cool, remove from the pot and knead with your hands until smooth. 
5. If not colored yet, separate the doh into balls to color.  Make the doh into a bowl and put some food coloring in the middle, then fold the doh around it and knead again until the color is even throughout your play-doh.  You may want use to gloves because if the liquid dye gets on your hands, it will stain!  Once it's worked into the doh, it'll be fine.
6. Make something neat!  Tell me about it!
7.  Store it in an air tight container like tupperware or any other plastic food bins.  If it starts to dry out you can work some warm water into it to moisten it up again...or just make more :)


Thursday, September 8, 2011

Duct Tape Projects

We had a great time making our duct tape wallets last night.  Everyone was so creative with the colors, I can't wait to post the pictures  of what everyone did.  For those of you who couldn't make it or who just want more duct tape, here are some more projects you can try!

Duct Tape Rose

Duct Tape Tie

Duct Tape Ring

Duct Tape iPod Case

Duct Tape Skirt (perhaps you should make it a teensy bit longer?)

Duct Tape Top Hat

Duct Tape Book Cover

Done all these?  Why not try some projects of your own?  If you do, be sure to post it here so we all can see your duct tape craftiness!

Here are the instructions for the duct tape wallets we made last night if you would like to make one:

How to Make a Duct Tape Wallet
1.     Cut a piece of duct tape as long as this piece of paper is tall and lay down, sticky side up.  Cut another piece the same length and lay it on top, sticky side down, but about half way down the first piece.  (Hopefully without sticking the whole thing to the table!
2.     Fold the top part of the first piece down over the second, so there is no sticky part on top.  flip it over so the sticky part from the second piece is facing up.  Cut another piece of tape and lay on top again sticky side down covering just the sticky part of the other piece of tape.  Continue adding tape until you have a sheet that is about 6 inches by 8 inches. (the size of this paper)
3.     On your last piece of tape that still has sticky side exposed, fold up like you did to the top in the beginning.  Trim the sides to make it neat.
4.     Fold the whole sheet in half length wise and use two pieces of tape to close the sides.  If you want to, you can stop here!  This is a basic wallet with a pocket for bills.  If you want card slots, continue on!
5.     To make card slots, make 3 sheets just like the big one you made, but make these 3.5 inches by 2.5 inches.  (Need a guide?  Use the smaller rectangle on this piece of paper) Place one on the inside of your wallet, the slot that will be the highest, and tape down the other three sides.  Then add the next one a bit lower and repeat, and then again for the 3rd card slot.  Ta-dah! Card slots!  Now you have somewhere to put your library card.
6.     You can make more card slots for the other side of your wallet, or you can make an ID slot.  T--o make an ID slot get a piece of tape that is same height as the card slot.  Cut it in half and fold both pieces in half lengthwise, sticky side to sticky side.  Then cut a piece of tape that is the length of the card slot and cut that in half lengthwise too.  Before folding each piece in half however, line up the other two pieces at the ends.  You are making a 'frame' for your ID, so keep that in mind!  Once you have your frame, line it up on your wallet and tape three sides down. 
7.     Fill your super fancy new duct tape wallet with money and lots of cards!

Need moooooore ideas?  Try some of these duct tape themed books available from other libraries:
  • The Original Duct Tape Halloween Book by Jim Berg
  • The Jumbo Duct Tape Book by Jim Berg
  • Ductigami: The Art of Tape by Joe Wilson
  • Got Tape by Ellie Schiedermayer
These books are not available through the library system, but if you really want one try amazon!
  • Stick it! 99 Duct Tape Projects by T.L. Bonaddio
  • The Ultimate Duct Tape Book by Tim Nyberg
  • Kid's Guide to Duct Tape Projects by Sheri Ann Bell-Rehwoldt
Thats all!  Leave me a comment if you have any other links to cool duct tape projects =)